
That flickering blue flame isn’t just a pilot light; it’s a sentinel guarding your home’s safety. When it refuses to stay lit, it’s often doing exactly what it was designed to do by cutting off gas flow when conditions aren’t perfect. You might be standing in a chilly basement on a freezing New Jersey night, feeling a spike of anxiety as you strike yet another match. We understand the frustration of watching that flame vanish the moment you release the control knob. Troubleshooting a pilot light that won’t stay lit doesn’t have to be a source of stress or a mystery.
You deserve a home that feels secure and warm, not a source of constant mechanical worry. In this guide, you’ll learn why your pilot light keeps going out and how to safely inspect the most common causes before you consider calling for service. We’ll examine everything from soot-covered sensors to simple drafts that disrupt the system. You will gain the clarity needed to determine if a part is truly broken or if a quick fix will restore your heat. By the end, you’ll know exactly how to handle the situation or when it’s time to bring in a professional to ensure your family’s comfort.
Key Takeaways
- Understand how your pilot light serves as a safety sentinel to prevent gas leaks and maintain your home’s security.
- Follow a methodical approach to troubleshooting a pilot light that won’t stay lit while maintaining a safe environment.
- Identify the thermocouple as the primary cause of failure and learn why simple soot buildup often stops the flame.
- Recognize critical safety red flags, such as the smell of mercaptan, that require you to stop DIY efforts immediately.
- Gain the confidence to distinguish between a simple fix and a complex repair that requires a licensed expert’s intervention.
Understanding the Pilot Light: Your System’s Safety Guardian
Your home’s heating system relies on a delicate balance of fuel and fire to keep your family comfortable. At the heart of many traditional systems is the pilot light, a small, standing flame that serves as the ignition source for the main burners. While modern high efficiency HVAC systems often use electronic ignitions, many established homes in New Jersey still feature these reliable standing pilots. You will typically find them in older furnaces, steam boilers, and traditional tank water heaters. Understanding what is a pilot light and how it functions is the first step in ensuring your household’s domestic well-being. This flame is not merely a convenience; it is a key component in the gas safety valve assembly designed to prevent hazardous gas buildup.
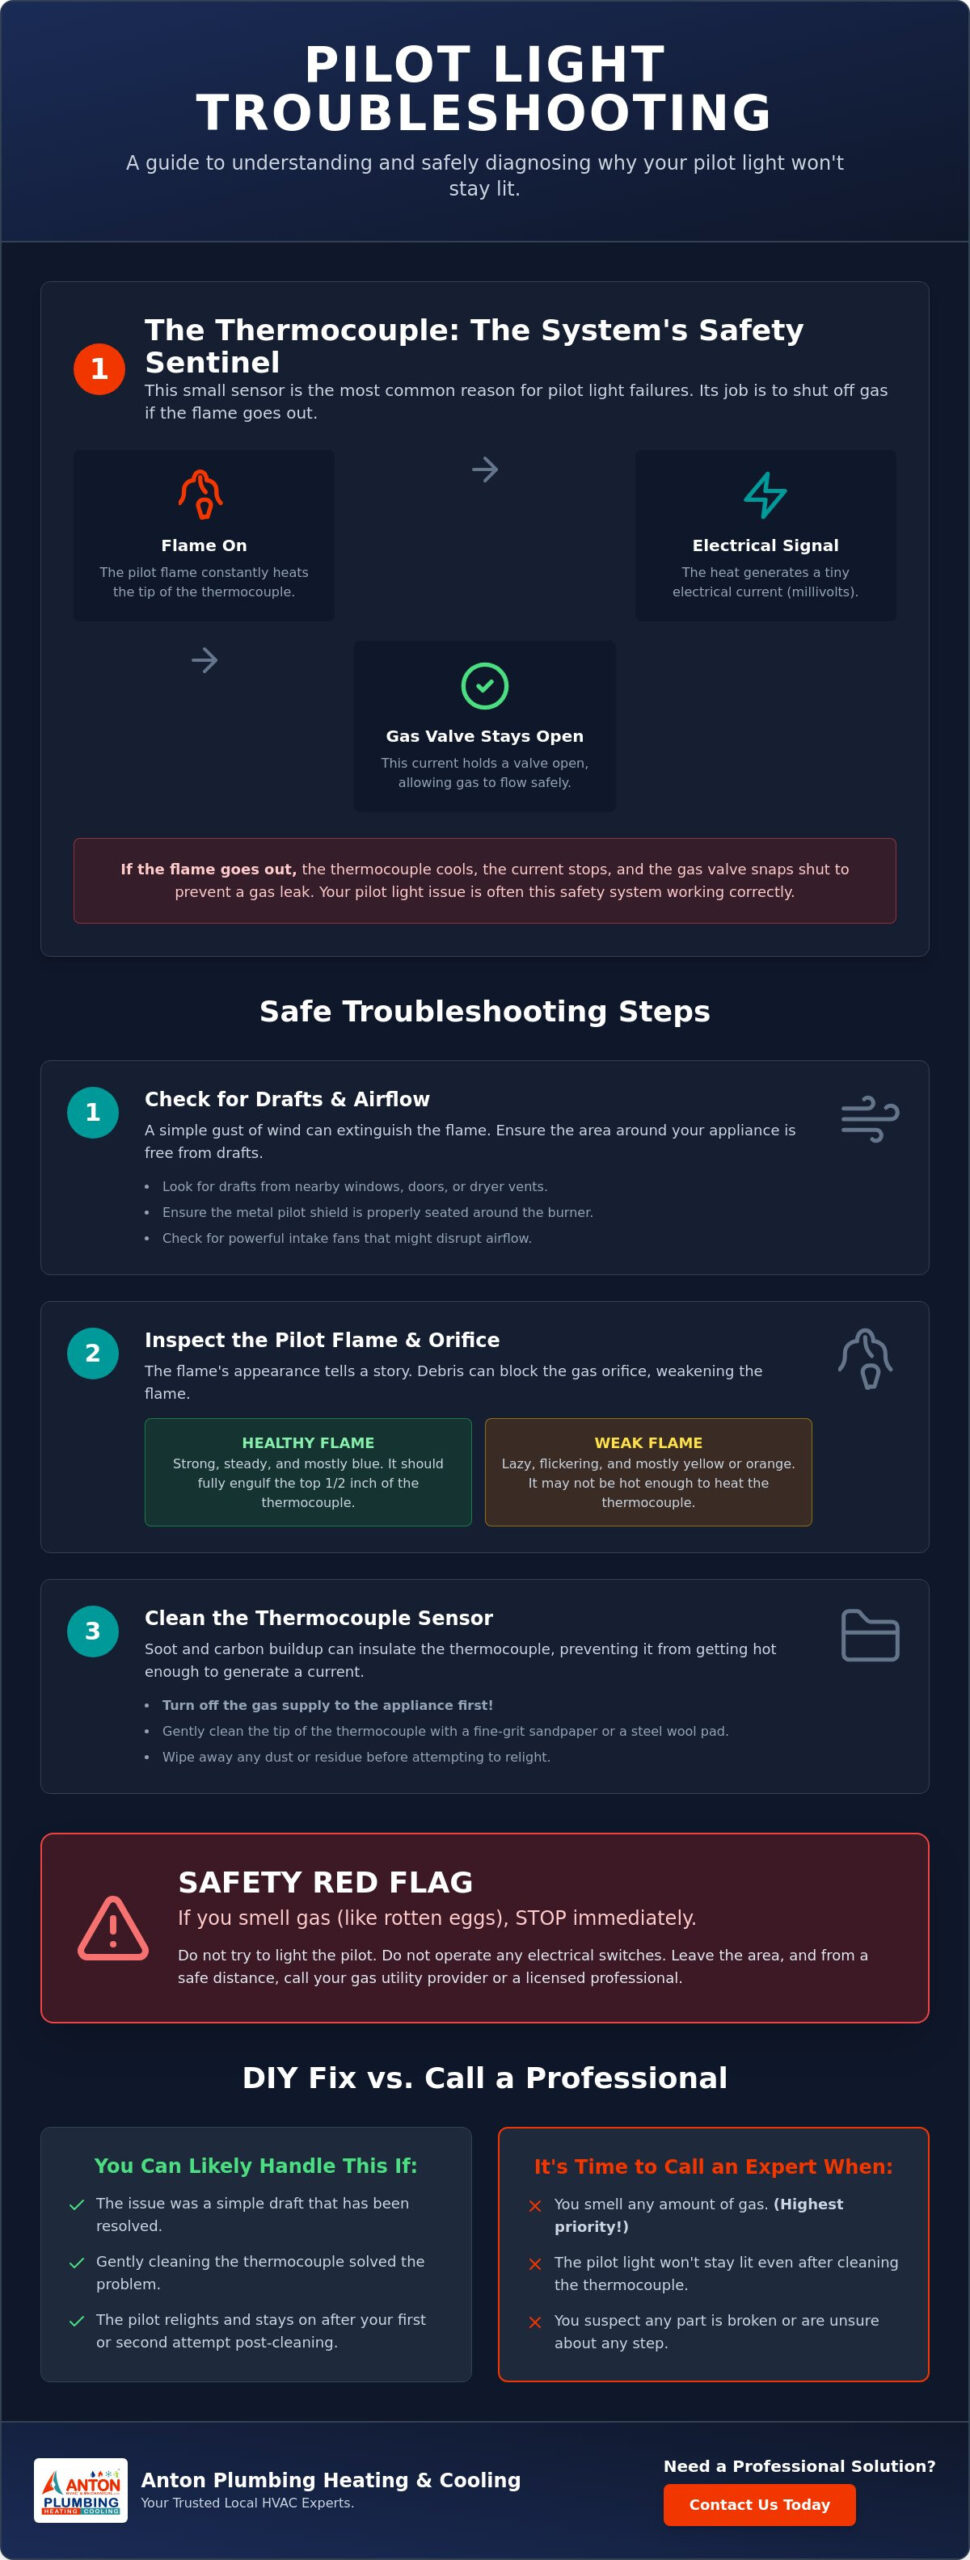
The system operates through a specialized part called a thermocouple. The thermocouple is the sensor that ‘tells’ the gas valve it is safe to stay open by detecting the constant heat of the pilot flame. If this sensor fails to detect heat, it acts as a guardian by immediately shutting down the gas supply. When you begin troubleshooting a pilot light that won’t stay lit, you are essentially investigating why this safety loop has been interrupted. A flickering or extinguished pilot is often a sign that your system is performing its protective duty by preventing unburned gas from entering your living space.
How the Pilot Flame Works with the Gas Valve
The relationship between the flame and the gas valve is a precise mechanical process. When the pilot is burning correctly, the flame constantly heats the tip of the thermocouple. This intense heat generates a tiny millivolt electrical current that travels through a copper lead to the gas control valve. This current is just powerful enough to hold an electromagnetic plunger in the “open” position. This allows a steady stream of gas to reach the pilot burner. If the flame is extinguished by a draft or a mechanical failure, the thermocouple cools down within seconds. The electrical current stops, causing the valve to snap shut. This fail-safe mechanism is why troubleshooting a pilot light that won’t stay lit requires a patient, safety-first approach.
Furnace vs. Water Heater Pilot Assemblies
While the underlying safety physics remain the same, the physical layout of these assemblies differs significantly between appliances. Furnace pilots are often more difficult to access; they are typically located deep within the combustion chamber behind heavy metal access panels or protective shrouds. You may need a flashlight and a long-reach lighter just to see the assembly. In contrast, water heater pilots are usually found at the very bottom of the tank. They are often visible through a small glass viewing pane or behind a simple removable metal door. Because of these different physical configurations, your approach to cleaning or inspecting the parts will vary. Regardless of the appliance, the safety principles remain identical; never force a valve and always follow the manufacturer’s specific lighting instructions.
Step-by-Step Troubleshooting for a Fading Pilot Flame
Before you begin the physical process of relighting your unit, verify that the issue isn’t coming from the main gas supply. Check your other gas appliances, such as a stove or fireplace, to ensure they are receiving fuel. If multiple appliances are failing, the problem lies with your utility provider rather than your specific equipment. When you are ready to focus on troubleshooting a pilot light that won’t stay lit, safety must be your absolute priority. If you have already tried to light the pilot and failed, you must wait at least five minutes before trying again. This delay allows any accumulated gas to dissipate safely, preventing a sudden flare-up when you introduce a spark.
Step 1: Check for Drafts and Airflow Issues
The environment surrounding your appliance plays a major role in its performance. Basements in East Brunswick often feature older, drafty windows or poorly sealed utility doors that can allow a sudden gust of wind to extinguish a weak flame. Inspect the area for any cross-breezes created by nearby dryer vents or high-powered HVAC intake fans. Ensure that the metal pilot shield is properly seated around the burner assembly. If this shield is loose or missing, even a minor change in air pressure can pull the flame away from the sensor. Stabilizing the air in your utility room is a simple first step in troubleshooting a pilot light that won’t stay lit.
Step 2: Inspect and Clean the Pilot Orifice
A healthy pilot flame should be a crisp, steady blue and should wrap directly around the tip of the thermocouple. If you see a flickering, lazy yellow flame, it is a clear sign that the pilot orifice is restricted by dust or carbon buildup. This soot acts as an insulator, preventing the heat from reaching the safety sensors. You can often resolve this by using a can of compressed air to gently blow away debris from the pilot assembly. Avoid sticking wires or needles into the orifice, as this can enlarge the hole and create a dangerous flame height. If cleaning the area doesn’t restore the blue color, you may need professional furnace repair to clear a deeper blockage.
Step 3: Test the Relighting Procedure
To restart the system, turn the gas control knob to the ‘Pilot’ position. Press the knob down fully to bypass the safety valve and use your long lighter or the built-in piezo igniter to catch the flame. You must hold the knob down for at least 60 seconds. This duration is necessary because of how a thermocouple works; it requires a specific amount of time to generate the electrical current needed to hold the valve open. Slowly release the knob after one minute. If the flame disappears and you hear a metallic click, the safety valve has snapped shut because the thermocouple isn’t sending a strong enough signal. This usually indicates that the sensor itself has reached the end of its lifespan.
The Thermocouple: The #1 Reason Pilot Lights Fail
When you are troubleshooting a pilot light that won’t stay lit, the most frequent culprit is a failing thermocouple. This small copper rod sits directly in the path of the pilot flame, acting as a critical safety sensor that monitors the presence of heat. Because it is constantly exposed to fire, the metal undergoes significant stress over time. A thermocouple typically lasts 5 to 10 years depending on usage. As it ages, carbon buildup, also known as soot, begins to insulate the rod. This layer of oxidation prevents the sensor from heating up enough to signal the gas valve to stay open. Even a thin coating of black residue can trick the system into thinking the flame has gone out, triggering an immediate shutdown for your family’s safety.
Beyond dirt and age, physical misalignment can cause the system to fail. The rod must be positioned so the blue part of the flame envelops the top half-inch of the sensor. If the assembly was bumped during a filter change or has shifted due to years of vibration, the thermocouple will cool down. Understanding how a thermocouple works as a safety device helps you see why precision is so important. When the sensor is even slightly out of place, the electromagnetic valve won’t receive the millivolt current it needs to remain open.
Cleaning a Dirty Thermocouple
If you suspect soot is the issue, you can often restore the connection with a simple cleaning. Use a piece of fine-grit sandpaper or an emery cloth to gently rub the copper rod. You don’t need to apply heavy pressure; the goal is to remove the black oxidation until the bright copper color returns. Once the metal is shiny again, wipe it clean with a dry cloth to remove any remaining grit. Try relighting the pilot after this cleaning. If the flame now holds after you release the knob, you have successfully removed the insulation that was blocking the heat transfer.
Identifying a Broken Thermocouple
Sometimes cleaning isn’t enough because the part has suffered internal damage. Inspect the copper line leading from the sensor to the gas valve for any visible cracks or kinks. If the tip of the rod appears burnt through or is severely bent, it is time for a replacement. A definitive sign of a dead sensor occurs during the lighting process. If the pilot stays lit while you hold the button down but dies the very second you release it, the thermocouple is likely dead. At this stage, troubleshooting a pilot light that won’t stay lit moves from simple maintenance to a part replacement that ensures your unit remains a reliable guardian of your household’s comfort.
When Troubleshooting Becomes Dangerous: Safety First
Gas appliances require a high level of respect. While the maintenance steps mentioned in previous sections are safe for most homeowners, you must recognize the limits of DIY work. Knowing when to stop is the mark of a smart homeowner who prioritizes domestic well-being over a quick fix. If you encounter a gas control knob that is frozen or stuck, never use tools like pliers or wrenches to force it. These valves are made of soft metals that can easily crack or strip, leading to a dangerous leak. If you smell a distinct “rotten eggs” odor, which is the chemical mercaptan added to natural gas, stop troubleshooting immediately. Evacuate your home and call your gas utility provider from a safe distance.
A persistent issue with a pilot is rarely an isolated incident. If you find yourself repeatedly troubleshooting a pilot light that won’t stay lit, the system is likely signaling a deeper mechanical failure. Pushing past these safety barriers can lead to hazardous conditions for your family. Safety isn’t just about the immediate flame; it’s about the integrity of the entire fuel delivery system. When a system fails to stay lit after multiple correct attempts, it’s a clear signal that a protective expert needs to evaluate the unit’s internal components.
The Danger of Carbon Monoxide (CO)
A healthy pilot flame should be a steady, crisp blue. If yours is flickering yellow or orange, it indicates incomplete combustion, which produces carbon monoxide. This colorless, odorless gas is a silent threat to your household’s security. As of June 2026, most states have strict laws requiring functional carbon monoxide detectors in residential dwellings. Ensure your detectors are functional and have fresh batteries before you begin any HVAC troubleshooting. Watch the flame closely; if it appears to be “wafting” or blowing around even when there are no drafts, you may have a cracked heat exchanger. This is a critical safety failure that requires an immediate system shutdown.
Signs of a Faulty Gas Control Valve
Sometimes, even after cleaning or replacing the thermocouple, the pilot refuses to catch. This often points to a failure in the internal solenoid of the gas control valve. This electromagnetic component is responsible for the final “go/no-go” decision for gas flow. Replacing a gas valve is never a DIY project. It involves breaking gas seals and requires precise pressure calibration that only a licensed professional can perform. For a definitive diagnosis and localized technical support, you can consult our HVAC Repair in East Brunswick, NJ guide. If you suspect your valve has failed, it’s time to reach out to the professionals for Furnace Repair and Installation to restore your home’s warmth safely.
Professional HVAC Solutions in Old Bridge and Jersey City
Anton Plumbing Heating & Cooling has served the New Jersey community for over 28 years, acting as a steadfast guardian for local households. When you reach the end of your DIY efforts troubleshooting a pilot light that won’t stay lit, you need more than just a basic repair; you need the technical confidence of a seasoned veteran. Our team understands that a cold home in Old Bridge, East Brunswick, or Jersey City isn’t just a minor inconvenience; it’s a direct threat to your family’s domestic well-being and security. We provide 24/7 emergency response for total heating failures, ensuring you are never left without a clear solution during a utility crisis. Sometimes, a pilot that refuses to stay lit is a clear signal from an aging system that it’s time for a high-efficiency upgrade to restore your peace of mind.
Why Choose a Licensed NJ Professional?
Selecting a professional means looking far beyond the immediate flickering flame to the health of your entire home infrastructure. Our technicians hold both NJ State Master Plumber and HVACR licenses, providing you with the peace of mind that all work meets the highest ethical and safety standards in the industry. We don’t rely on guesswork; we employ advanced diagnostic technology to handle complex gas line repairs and identify hidden leaks with surgical accuracy. Unlike temporary DIY fixes, every professional repair we perform comes with labor and material warranties that protect your home investment. If our diagnostic shows your unit is beyond a reliable repair, we can guide you through a water heater replacement. To ensure these modern upgrades are within reach, we offer a specialized rebate program with zero-interest options for qualifying homeowners.
Schedule Your Heating Tune-Up Today
The most effective way to handle a pilot light issue is to prevent it before the New Jersey winter hits its peak. A comprehensive heating tune-up is a proactive investment in your home’s security and long-term comfort. During a service visit, we perform a deep cleaning of the entire burner assembly, not just the pilot orifice. We also inspect the heat exchanger for microscopic cracks and verify that your gas pressure is perfectly calibrated for modern efficiency. This meticulous approach ensures your system remains a dependable source of warmth throughout the season. Don’t wait for a total system breakdown to address a struggling pilot. Call Anton Plumbing Heating & Cooling for fast, ethical, and reliable service. We remain active and ready to respond at a moment’s notice to keep your local family safe and comfortable.
Secure Your Home’s Warmth and Safety Today
Restoring a steady blue flame is about more than just comfort; it’s about the security of your household. You now understand that the thermocouple acts as a vital safety loop and that a flickering yellow flame is a signal to check your carbon monoxide detectors. While troubleshooting a pilot light that won’t stay lit can often be resolved with simple cleaning, persistent failures indicate a need for professional diagnostics to protect your family from gas leaks or system failures.
Don’t spend another freezing night worrying about your heating system. With over 28 years of local New Jersey experience, our licensed NJ Master Plumbers and HVACR contractors are ready to provide immediate relief. If your DIY efforts haven’t restored your heat, contact Anton Plumbing Heating & Cooling for 24/7 emergency service in Old Bridge and Jersey City. We are committed to ethical standards and high-tech accuracy in every repair. Take the stress out of home maintenance and let a protective expert ensure your system is running safely and efficiently.
Frequently Asked Questions
Is it safe to leave a pilot light off if I can’t get it to stay lit?
Yes, it is perfectly safe to leave the pilot light off as long as you turn the gas control dial to the “OFF” position. While the safety valve is designed to snap shut automatically when the flame disappears, manually turning the dial provides an extra layer of security for your household. This prevents any residual gas from entering the combustion chamber while you wait for a professional technician to arrive.
How do I know if my thermocouple is bad or if it’s the gas valve?
The most common diagnostic is the “hold-and-release” test during the lighting process. If the flame stays lit as long as you are depressing the knob but vanishes the moment you let go, the thermocouple is almost certainly the culprit. However, if you have already installed a new thermocouple and the flame still won’t hold, the internal solenoid of the gas valve has likely failed. Replacing a gas valve is a complex task that requires a licensed NJ professional to ensure proper pressure calibration.
Why does my pilot light stay lit for a few minutes and then go out?
This behavior usually indicates that the thermocouple is generating a weak electrical signal that is right on the edge of failure. It can also be caused by a “lazy” yellow flame that isn’t making consistent contact with the sensor rod. Troubleshooting a pilot light that won’t stay lit for more than a few minutes often involves cleaning the pilot orifice to restore a crisp, blue flame that fully engulfs the sensor.
What should I do if I smell gas while trying to light the pilot?
Stop what you are doing immediately and evacuate all occupants from the home. Natural gas providers add a chemical called mercaptan to the gas supply, which creates a distinct “rotten egg” odor to alert you to leaks. Do not flip any light switches, use a phone, or light a match inside the building, as these can act as ignition sources. Call your gas utility company or an emergency repair service from a safe distance outside the house.
Can a dirty air filter cause a furnace pilot light to go out?
Yes, an extremely clogged air filter can restrict airflow and cause the furnace to overheat, which may trigger a safety limit switch. While the limit switch primarily shuts down the main burners, the resulting turbulence or pressure changes within the burner assembly can sometimes extinguish a standing pilot. Regularly changing your filters is a simple maintenance step that supports the overall domestic well-being of your heating system.
How much does it typically cost for a professional to fix a pilot light issue in NJ?
While specific service rates vary, industry data from June 2026 indicates that a standard HVAC service call and diagnostic visit typically ranges from $75 to $150. If the technician needs to replace a thermocouple, the total cost for the repair generally falls between $100 and $300. This professional service includes a comprehensive safety check of your gas connections that a DIY fix cannot provide.
Does a water heater pilot light use a lot of gas if it stays on all the time?
A standing pilot light uses a very small amount of fuel, typically costing only a few dollars per month based on current natural gas price forecasts. While newer high-efficiency units use electronic ignitions to save energy, the heat from a standing pilot isn’t entirely wasted. It helps maintain the water temperature in the tank, slightly reducing the frequency with which the main burners need to cycle on.
Can I replace a thermocouple myself on a standard gas water heater?
Many homeowners successfully replace thermocouples as a DIY project, but it requires careful attention to the gas supply lines. You must ensure the new rod is correctly positioned in the pilot bracket and that the copper lead is threaded into the gas valve without cross-threading or over-tightening. If you feel any anxiety about working with gas components, it’s always better to contact a licensed NJ Master Plumber to ensure the job is done safely.


